Testing in NetPen

NetPen is an interactive whiteboard that can be used across the world or in a single classroom. Because NetPen is often used in an instructional role, special support has been added to use NetPen for testing.

For reasons we’ll see, a Test is any one page in NetPen and a .pen file might contain several tests, each on its own page. Tests are always stored on negative pages so they are not automatically shared when the host first starts up.

There can be any number of questions on a test page. Questions can take any form and are only limited by the instructor’s imagination. For example:


Changes to Text

To support multiple choice questions, whenever NetPen sees a CTRL+SPACE character at the beginning of the line, NetPen converts the CTRL+SPACE from an invisible typed character to a box. Here’s an example of a single text entry representing a multiple choice question:


This is analogous to a check box on a printed form as the check box doesn’t have an electronic on/off. To select their choice, the student would do so using one of the drawing tools (e.g., make a check mark) and writing as they would on paper.


Conducting a Test

Video

To assist the instructor in conducting the test and prevent cheating; NetPen has a new Dialog that only the Host can bring up called the Test Control Dialog. This dialog is launched from the menubar under Connection and is used to assist in conducting the test.

The Test Control dialog has these behaviors:
Use Page  Page on the host to copy the test from. This page must be negative to prevent tests from accidentally being displayed to students (NetPen does not transmit data on negative pages) and to support test retrieval.


Begin Test 
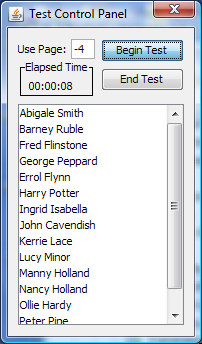
When this button is pressed the test is copied from the host to the clients -1 page and the timer is started. The clients are set to display page -1 and the clients can no longer communicate with another. All objects from the host can not be moved, altered, or deleted. All of the negative pages on the host are replaced (don’t worry, the original file still has all your tests) with a copy of the test starting at page -1 and decrementing for each student. So, in the example to the right, Abigale Smith’s results would be on page -1 and Errol Flynn’s results would be on page -5. In addition to the test, each page also has the student’s login name and email address. Clicking on the name of a student in the list box will change the host’s page, showing that student’s work. As a student works, their work is sent back to the appropriate host page. All changes from the student can not be altered moved or deleted – this prevents accidental mouse clicks from altering the work.

Any student that connects after a test has started is automatically put into test mode.

End Test  When pressed the timer stops and the host is prompted for a save file name that they can later use to correct and distribute the tests. Once the save operation has completed the clients are unlocked so they can once again share data. All of the student’s results are still loaded in the host and the instructor can display that page to an overhead or copy the contents to a positive page where it can be output for all of the students to see.


Grading Tests

Video

When an instructor is ready to grade papers they open the test result .pen file that they saved when they clicked the End Test button. Each of the negative pages contains the test and one student's answers.  At the top of the page is the student's name, email address, and a timestamp.  To grade the tests, the instructor traverses each negative page and using the NetPen tools they make marks directly to the students work. 

If Outlook is being used, the finished graded test can be emailed back to the student by using the File->Mail To...  This takes the active negative page and creates a file where the data on the instructor's negative page is copied to page one and saved as an attachment to an email addressed to the student.

NetPen’s tools can take a lot of the drudgery out of grading files. For example, an instructor could start the grading session by importing to page 2 a “solved” test that explains how the results were obtained. On page 3, they could show alternate techniques.  But, you don't want to use page 1 because that that's where the student's graded test will go.  When they do the next student, they don’t have to change any of the other pages.

Similarly, the copy/paste ability, using CTRL+C and CTRL+V can be used to paste information directly on a student's test.  Using Colors and fonts to separate the instructor's remarks from the student's answers opens a wide array of possibilities.